Help Page Calts
Calts can be found at:
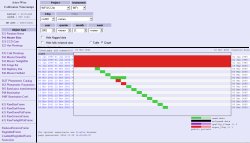
The following help is available, click on a part of the image or one of the links
1a. General settings; left part of the screen
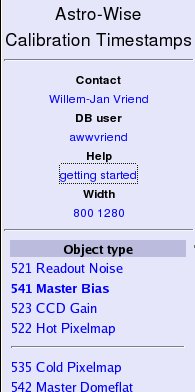
Here you can login and select the object type. From top to bottom :
|
- (Contact) My email adress, mail me (Willem-Jan Vriend) with any question or comments you have about CalTS.
- (DB User) The (astro-wise) username that is used for interaction with the database. When you visit
this page for the first time this will be the anonymous user awanonymous. You can click on it
to log in with your own astro-wise username / password. In the login screen you can specify
to 'remember' your username and password for future sessions. Then your username and password
will encrypted and stored in a cookie.
- (Help) The help pages, the page you are reading.
- (Object type) After filling in the input parameters, click on the object type to query this type for the
set parameters.
|
1b. Query input; upper part of the screen
Here you specify the query parameters. The parameters control which object(s) will be shown in either
a graphical or tabular presentation. The selected parameters are persistent, so you can set the parameters
and select different object types from the left. The header of a parameter will be greyed out if the current
object type does not depend on that parameter.
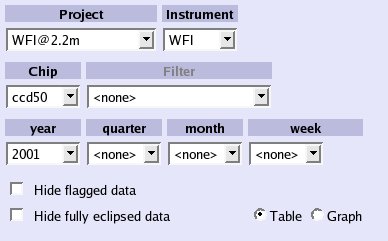
- (Project) Specify the project, this will trigger an update of the possible instruments.
- (Instrument) Specify an instrument, this trigger an update of the possible chips and filters.
- (Chip) Specify a chip, select none for any chip.
- (Filter) Specify a filter, select none for any filter.
- (Year) Year is used to query a date attribute of the object type. This could be the timestamp range, the
observation date or the creation date of the object type, depending on whether the object type has timestamps,
an observation or creation date. The date query can be restricted further using
quarter, month or week selection. The possible year values are taken from the database for the selected
object type, to refill the years for another type, click the specific object type on the left.
- (Quarter) Used to restrict the date query, see (Year).
- (Month) Used to restrict the date query, see (Year).
- (Week) Used to restrict the date query, see (Year).
- (Hide flagged data) Check this to hide all flagged data in the output.
- (Hide fully eclipsed data) Check this to hide all the data which is fully eclipsed by other data, applies
only to the graphical output.
- (Table vs Graph) Select Table for tabular output or Graph for graphical output. Only object types
that have timestamps support graphical output, in all other cases CalTS will switch back to tabular output.
1c. Graphical Output
The graphical output plots the timestamp ranges of all queried objects. Horizontal (left to right)
the timestamp ranges go from low to high, vertical (top to bottom) the creation_date.
The timestamp range is plotted as a colored bar from timestamp_start to timestamp_end. To edit timestamp
ranges and the is_valid flag click on the textual timestamps. When an object is eclipsed by another
object the eclipsed timestamp range will be shown in black.
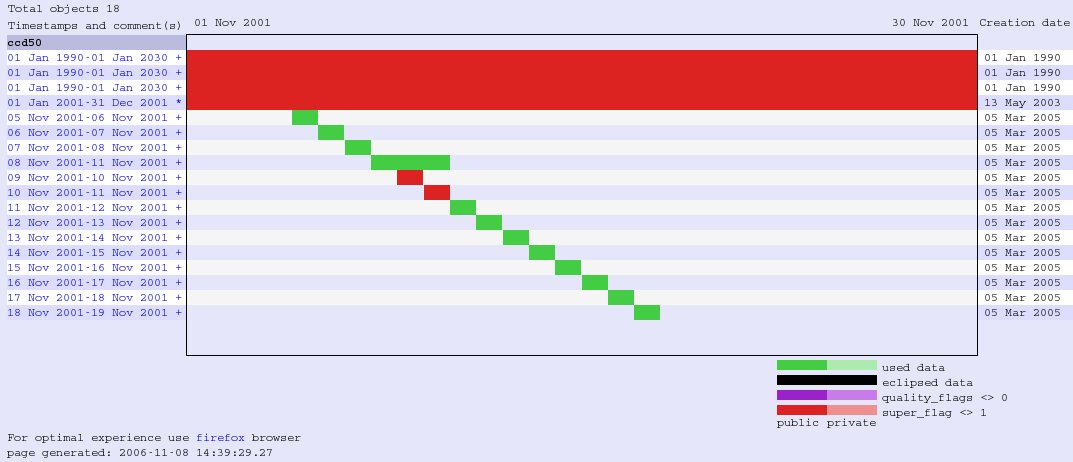
- (Graph)When you hover with the mouse over a bar details will be given of the specific object. Hovering
over a eclipsed part will also show the eclipse range.
- (Left of the graph) In the heading the chip and or filter is given, below is the list of textual
timestamp ranges, click on these to edit the timestamps and is_valid flag. To the right of these
timestamp ranges is a comment indicator. The + symbol means no comment, click to add one.
The x means there are existing comment(s), click to view or add one. If there is an image associated
with the object a link is given to this image, click on the link ('I') to open the image in the browser.
- (Right of the graph) Here the creation date of the objects is plotted.
- (Top) The total number of objects is given and the date range used to query.
- (Bottom) The generation date of the page is plotted and a legend for the used colors given.
1d. Tabular Output
In the tabular output screen the query results are plotted in tabular form. The columns vary from object
type to object type. The columns can be clicked to sort them, the '-' indicates the column is sorted descending
and the '+' for ascending sorting. Click on the filename to open the window for editing the timestamps and
is_valid flag. The + or x sign in the second column indicates the presence of Comment(s) for this object.
Click to add or view the comments.
The is_valid flag of multiple objects can be set or unset by selecting the checkboxes in front
of the objects and click the 'Make Valid' or 'Make Invalid' button at the bottom.
A comment should always be provided when (in)validating objects.

- The coloring of the flags is the same as for the graphical output.
- If the object type has the attribute then the following list of columns will be displayed :
Filename, Object, Name, Chip, Filter, Observation (DATE_OBS),
Creation (creation_date), Start (timestamp_start), End (timestamp_start), is_valid flag,
Quality flag, Project, Privileges.
2. Editting
In the edit window the timestamps can be changed and the is_valid flag set/unset, also comments can be
added to the altered objects. This can be done for one or multiple objects.
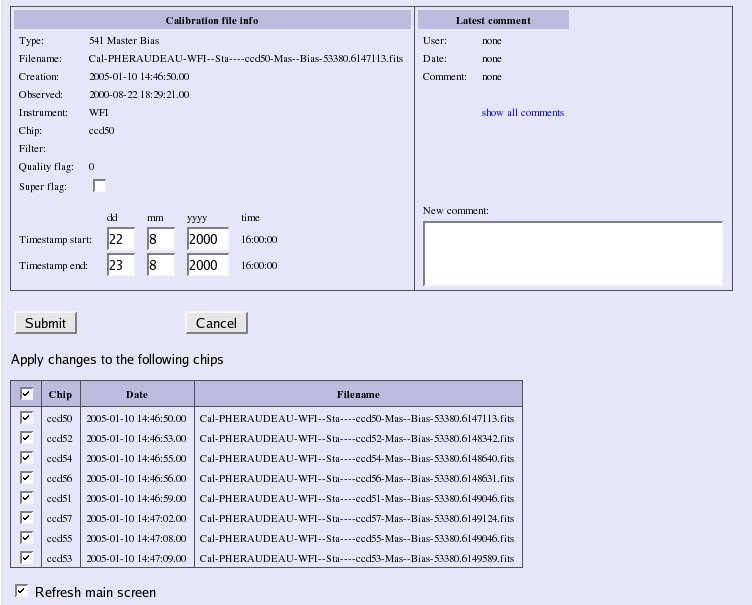
- The left upper part of the screen gives an overview of the object(s) properties. Here the flag and timestamps can be edited.
- The right upper part of the screen gives the latest comment of the object which was selected. New comment(s) can be specified for
the objects for which the flag and or timestamps will be changed.
- The lower part of the screen states the (target) objects to which the changes can be applied. Here you can
select the objects to which the timestamp and/or flag changes should be applied. The upper checkbox can be
used to select or deselect all the lower checkboxes. The object that was clicked
on the main screen is always shown as the row with a white background.
- CalTS tries to group the target objects in a logical manner. As long as objects are processed for all
chips this will result in sets of processed objects for all chips which are sorted on creation date.
When a single chip has been processed, instead of all chips, CalTS can not group the targets anymore.
This will result in incorrectly grouped targets sorted on creation date.
- The submit button submits the changes, the cancel button quits the window without applying the changes.
- Select/deselect the checkbox before 'Refresh main screen' to do/not do a refresh of the main window.
3. From the command line
This section covers setting the timestamps and the is_valid flag from the command line.
On the AWE prompt timestamps and the is_valid flag can be changed. After changing these
attributes the object can be commited to the database using the recommit method. Notice that only
the timestamp_start, timestamp_end and the is_valid flag can be (re)commited to the database
in this manner, any other attribute that is changed will not be updated in the database.
Python example adjusting timestamps and is_valid:
# WARNING : the recommit(s) have been commented out in this example,
# these will change the timestamps and is_valid of the BiasFrame in the database !!
# query for a BiasFrame
import datetime
from astro.main.BiasFrame import BiasFrame
qry = BiasFrame.instrument.name == 'WFI'
bias = qry[0]
# substract one day from the timestamps start
bias.timestamp_start -= datetime.timedelta(1)
# and set timestamp_end to far future
bias.timestamp_end = datetime.datetime(2010, 1, 1)
# and commit changes to the database
# bias.recommit()
# make the BiasFrame invalid
bias.is_valid = 0
# bias.recommit()
# make the BiasFrame valid again
bias.is_valid = 1
# bias.recommit()
Python example adding a comment:
# WARNING : the commit has been commented out in this example
# query for a BiasFrame
from astro.main.BiasFrame import BiasFrame
qry = BiasFrame.instrument.name == 'WFI'
bias = qry[0]
# make a comment
from common.log.Comment import Comment
c = Comment()
c.make('A comment text', bias)
# c.commit()
